


How To Install Tape In Hair Extensions Like A Pro: The Ultimate Guide
Tape-in hair extensions are a common choice among clients and stylists for women and stylists seeking instant length, volume, and thickness without the damage of permanent methods. Whether you’re trying them for the first time or looking to perfect your technique, this step-by-step guide will show you how to install tape in hair extensions correctly, along with the essential tools, tips, and aftercare for a flawless, natural look.
What Are Tape-in Hair Extensions?
Tape-in hair extensions are lightweight, semi-permanent human hair wefts (weft = a strip of hair sewn or bonded at the top) applied with strong adhesive tape for a flat, natural blend. They add length, volume, and seamless fullness, last 6–8 weeks, and can be reused with replacement tape—making them one of the most popular, low-damage extension methods.
Why Choose tape-ins?
Before we dive into the installation process, it’s helpful to understand the benefits that make tape in extensions such a great option:
• Quick to Apply:
Full-head tape-in hair extensions install in under an hour for fast, salon-quality results.
• Lightweight & Comfortable:
Ultra-thin adhesive tape-in wefts feel light on the scalp and won’t pull natural hair.
• Reusable:
Simply replace the tape to reuse your Remy tape-in extensions every 6–8 weeks.
• Seamless Blend:
Flat, flexible seamless tape-ins blend naturally for an invisible, real-hair look.
• Gentle on Hair:
Low-damage tape-in extensions use no heat or glue, protecting natural strands.

What Tools You’ll Need
To install tape in hair extensions properly, you’ll want to have the following items on hand:
1. Clarifying Shampoo
Purpose: Deep cleans to ensure strong tape adhesion.
Use: Wash thoroughly; avoid conditioner.
2. Rat-Tail Comb
Purpose: Creates precise, clean partings.
Use: Section hair in thin, even rows.
3. Hair Clips
Purpose: Keeps sections organized and controlled.
Use: Clip away layers as you work upward.
4. Straightener / Blow Dryer
Purpose: Smooths hair and helps activate adhesive.
Use: Lightly straighten; apply low heat if needed.
5. Replacement Tape
Purpose: Ensures secure adhesion when reusing extensions.
Use: Remove old tape, apply new tape evenly.
Step 1: Prep Your Natural Hair
Clean hair is essential for a long-lasting tape in installation. Oils, conditioner, or product residue can prevent the adhesive from sticking properly.
Wash your hair thoroughly with a clarifying shampoo to remove buildup.
Skip conditioner near the roots, as this can create slip.
Blow-dry your hair completely. Extensions should never be applied to damp hair.
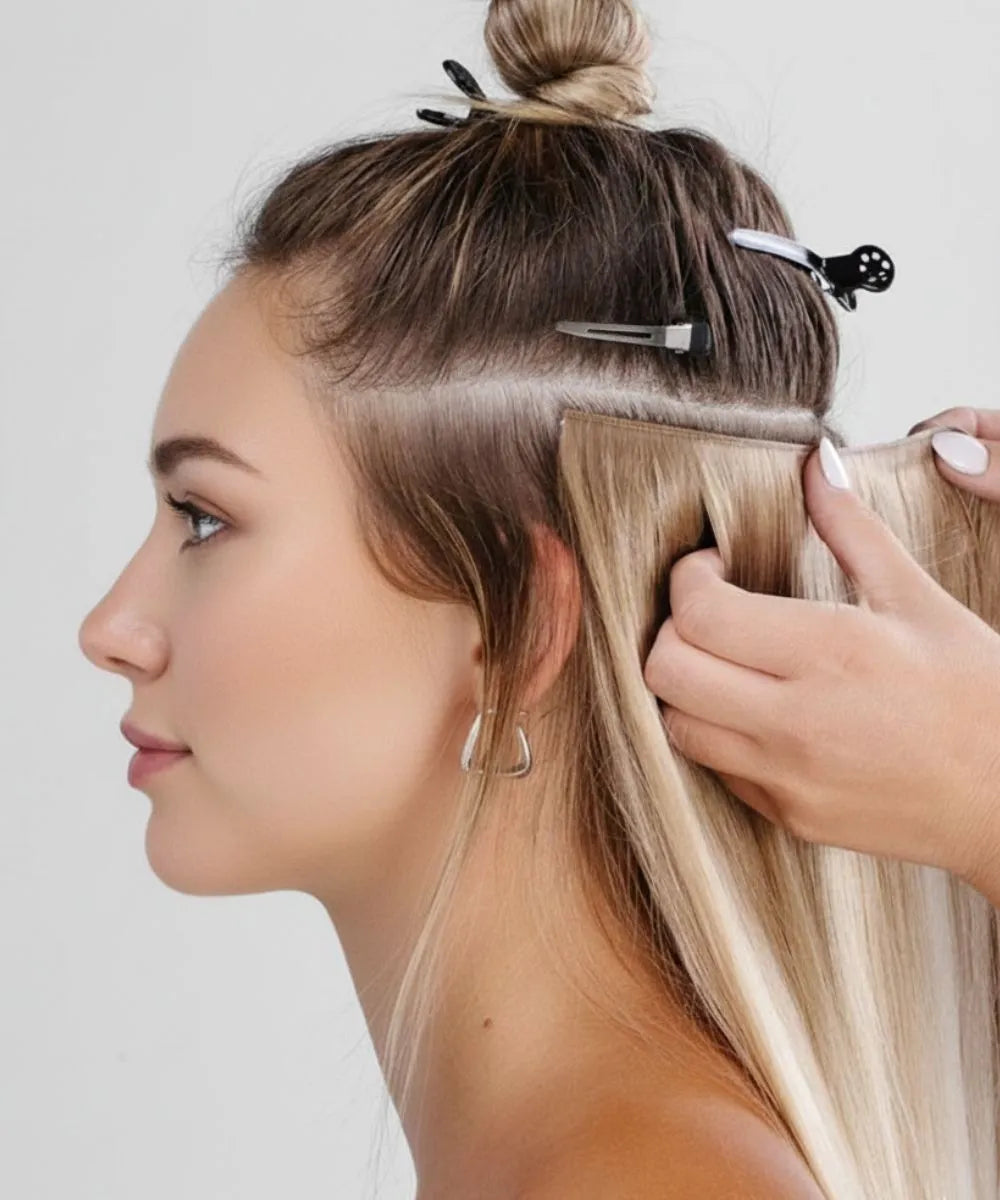
Step 2: Section the Hair
Start by sectioning your hair horizontally about one inch above the nape of your neck. Use clips to hold the rest of the hair out of the way.
The sections should be neat and straight for a natural look.
Each tape in extension will sandwich a small slice of your natural hair, so keep the parted sections clean and even.
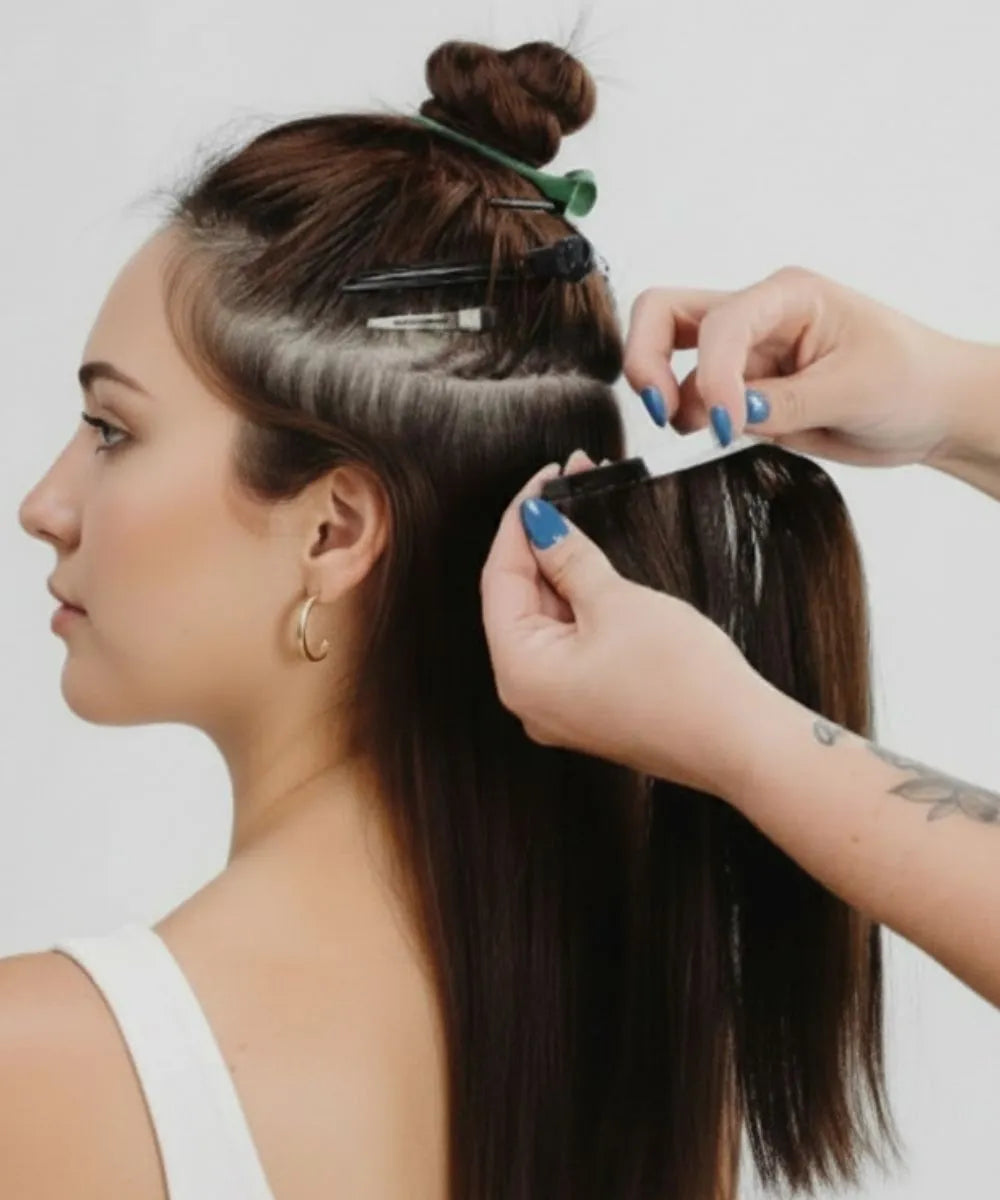
Step 3: Apply the First Tape
Take one piece of tape in extension and remove the backing to reveal the adhesive.
Place the first tape strip underneath a small section of your natural hair, close to the scalp (but not touching the scalp).
Press gently to secure.
Step 4: Sandwich the Hair
Take a second tape weft and place it directly on top of the first piece, with your natural hair section in between.
Press the two adhesive strips together firmly.
Use your fingers or a flat iron on a very low heat setting (optional) to press the adhesive together for extra hold.
This two-strip sandwich (place one adhesive weft under and one over the hair) locks the extension securely in place while keeping the bond flat and comfortable.
Step 5: Repeat the Process
Continue working your way up the head in horizontal sections.
Make sure you leave enough space between the scalp and the tape so that your hair can move naturally.
Avoid applying too close to the hairline or parting areas, where the tape might be visible.
Use consistent section sizes to ensure an even blend.

Aftercare Tips for Long-Lasting Tape Ins
Installing tape-ins is just the first step—maintaining them properly will make a huge difference in how long they last. Here are some must-follow care tips:
Wait 48 Hours Before Washing: Allow the adhesive to fully bond for a stronger hold.
Use Sulfate-Free Shampoo & Conditioner: Gentle, residue-free products prevent the tape from breaking down.
Brush Gently: Start at the ends and work upward with an extension-friendly brush to avoid tugging.
Avoid Oily Products Near Roots: Oils can weaken the adhesive and reduce the lifespan of your extensions.
Protect Hair While Sleeping: Braid or tie your hair in a loose ponytail to prevent tangling and matting.

FAQ — Tape-in Hair Extensions
Q1: How long do tape-in extensions last?
Tape-in hair extensions typically last 6–8 weeks per installation, depending on your hair growth and daily care routine.
Q2: Can I wash my hair right after installation?
No. It’s best to wait 24–48 hours before washing to allow the adhesive tape to fully bond to your natural hair.
Q3: Are tape-in extensions reusable?
Yes. Tape-in extensions are fully reusable—just replace the adhesive tape before reinstalling.
Q4: How often should I move up or adjust my tape-ins?
Most users need a move-up every 6–8 weeks, ensuring the extensions stay secure, seamless, and properly aligned with new hair growth.
Common Mistakes to Avoid — With Quick Fixes
Using conditioner before installation
Fix: Wash with a clarifying shampoo only. Avoid conditioner so the adhesive can bond securely.
Placing extensions too close to the scalp
Fix: Leave a small gap (about 1/4 inch) to ensure comfort and prevent the tape from showing.
Incorrect sectioning—too much or too little hair
Fix: Take a thin, even slice of hair. Enough to support the tape, but not so thick that it weakens adhesion.
Skipping routine maintenance
Fix: Move up or refresh tape-in extensions every 6–8 weeks to avoid matting and maintain a natural look.
Transform Your Hair Instantly with Tape-In Extensions
Tape-in hair extensions are one of the easiest, most natural ways to add length, volume, and thickness instantly. Follow the right steps—prep, section, sandwich, and style—for professional-looking results that last for weeks. Whether you’re a stylist serving clients or trying tape ins at home, proper application and care are key to keeping your extensions undetectable from a normal viewing distance and long-lasting.
Ready to upgrade your look? Discover the Ugeat Tape In Hair Extensions Collection— 100% human hair in a wide range of colors, lengths, and styles—designed to help you achieve the perfect, natural-looking hairstyle every time.
About Ugeat Hair
Ugeat Hair is a global leader in premium human hair extensions, offering a wide range of high-quality tape-in, clip-in, weft, and keratin extensions. Our products are crafted from 100% natural human hair, ensuring a seamless, natural blend with any hair type. Designed for comfort, durability, and easy maintenance, Ugeat Hair extensions are trusted by professionals worldwide for achieving stunning, long-lasting results.
Author Biography
Ava is an experienced expert specializing in hair extensions. With years of industry knowledge, she is dedicated to helping her audience understand the various types of hair extensions, how to choose the right ones, proper usage techniques, and essential maintenance practices to ensure long-lasting results.
Whether you're a beginner or an experienced hair extension enthusiast, Ava provides valuable information and tips to help you achieve your perfect hairstyle.


Leave a comment
This site is protected by hCaptcha and the hCaptcha Privacy Policy and Terms of Service apply.